Auto Control First Test Drives
Testing Setup
We strongly recommend getting the vehicle off the ground for your first test run, to run through all the gears and check it’s selecting gears properly, with minimal load on the drivetrain.
Gear Detection
You should have already tested that gear detection was working during initial setup. If not, test this now with the ignition on, and engine off, and make sure the ECU is correctly detecting the position of the auto shifter/ranger selector before starting the engine.
Check the Vehicle Goes Into Gear
With the engine running, with your foot on the brakes, check that the car physically selects a gear in drive. Have PC Link running to see that the target gear and gear are being commanded.
Often the shifter is physically controlling a hydraulic shuttle, and even when no solenoids are being triggers by a control unit, the transmission can still select a gear with hydraulics alone.
You can look up what gear your transmission will select when all shift solenoids are in a low state in PCLink help. For example the JATCO 4-speeds will select 3rd gear in this state, A340’s will select 4th. So when doing this test, make sure the trans is starting in 1st, not the gear you would grab with the solenoids unpowered.
Check the Transmission is Changing Gears
Slowly release the brakes and see that the transmission is selecting the actual gear commanded by the ECU. You can bring the speed up and check it starts changing up through the gears. You can test manual mode has been setup correctly at this point too.
Don’t forget to stop the wheels with your pedal brakes before placing the transmission in park.
You can now lower the vehicle to the ground for your first test drive.
First Drive and Road Tuning
Go for a gentle short drive up to a speed that will allow you to select all gears. You want to ensure the vehicle shifts through all the gears properly when commanded.
Most apparent after you first drive will likely be the shift firmness, and your shift table tune.
You may also want to make notes about the shift table. It should be apparent if you have set excessive figures in your shift table on the first drive.
Expect the shift to be firm while line pressures have not been tuned.
Shift Table
Tweak the figures in your shift table to get it to a driveable state for the rest of your testing for this phase. You can come back and tweak these numbers to perfection later in the tune, for now it just needs to function enough to get the rest of the initial set up completed.
Line Pressures
If shifts are excessively firm, you can start to bring back pressures back. It may pay stay under 50% duty this early in the tune, especially for applications producing more engine torque than factory.
Applying excessive torque, or torque much greater than stock while line pressures are too low can lead to slipping the transmission clutches or bands during shifting, which can damage the transmission to the point of needing a rebuild. Transmission clutch packs can go from good to completely burnt in a surprising short amount of time.
If you find the engine RPM’s “flair” (rev up like a slipping clutch) on shift, avoid repeating the conditions that lead to the flair, by either reducing torque, or increasing line pressures.
Gear Normalise Ratio
Gear Normalise Ratio corrects for differential final drive, and wheel diameter, and is applied to the current gear ratio to give us an accurate Clutch/TC Slip figure. When set up correctly, TC Slip should read around 0 while driving with the Toque Convert Lockup active.
To tune the ratio in PC Link, use logging to record:
Vehicle speed
Current Gear Ratio
Gear Ratio Calc.
Clutch/TC Slip
Torque Converter Status
Gear(status)
In each gear, activate TC Lockup, and once TC Lock is observed engaged, lay down a marker in your log (press B, or trigger some other input you can reference), and drive steady state for at least 10 seconds. The longer you can stay steady state, the more accurate the data you will be able to pull from your log. 30 seconds is good to aim for.
Wheel Speed Based Speed Source
When using auto control with wheel speed based speed source, there are two methods for setting up gear ratio calculation
Method 1
If you have the correct gear ratios in the gear ratio table, you need only check your “Gear Ratio Calc” while locked in a single gear. It’s best to use 3rd gear for this (your 1:1 gear).
In PC Link while viewing your log, set up a time plot with the above runtimes, the Gear Detection settings window, and a Statistics window showing Gear Ratio Calc.
Find where you drove steady state in 3rd gear with TC Lock enabled. Zoom in on the time plot so that only your steady state part of the log is visible on screen, this is important as the Statistics View gives stats on what is visible in the Time Plot View.
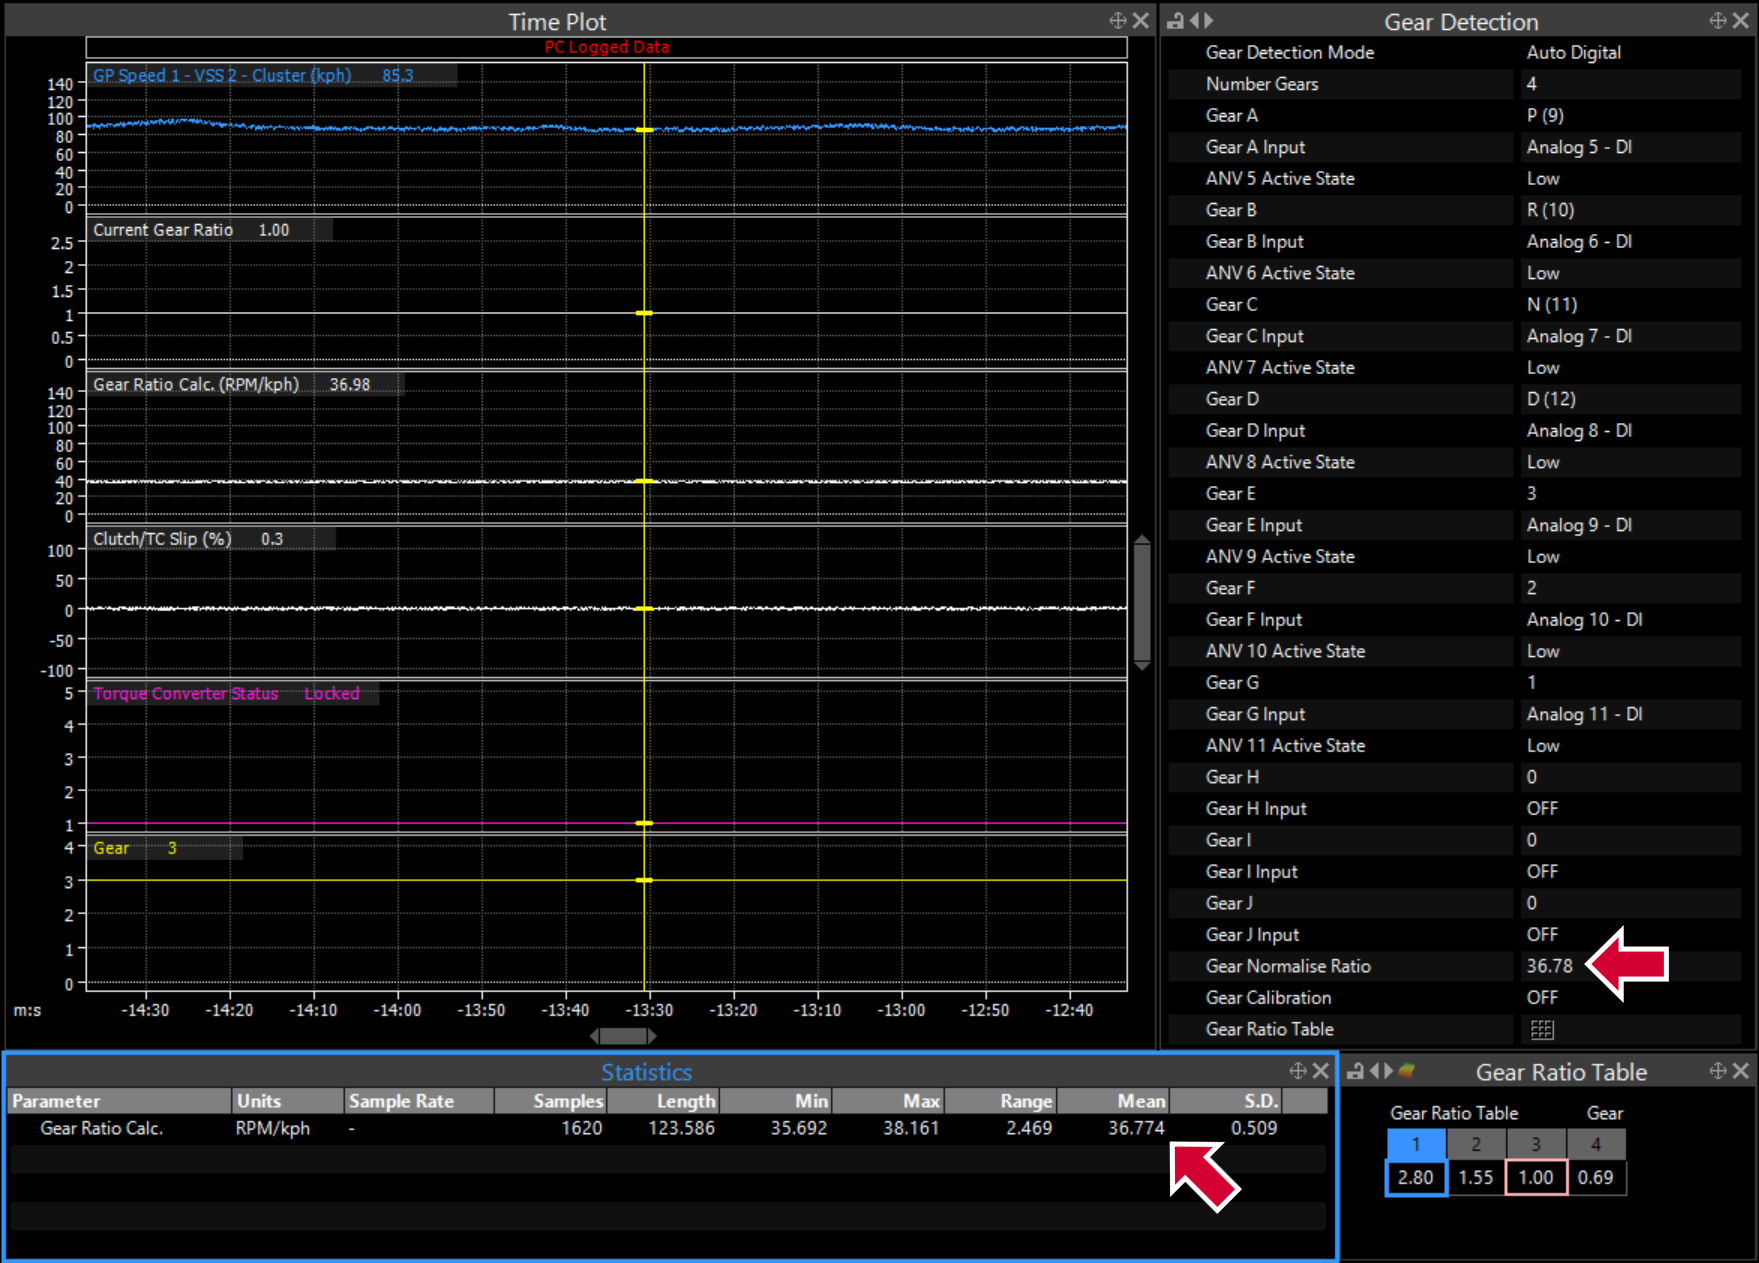
In the Statistics window, display the Gear Ratio Calc. runtime, the “Mean” figure is the number we are looking for. This number you can enter into the Gear Normalise Ratio directly, and that’s that.
If you don’t have the time plot zoomed into only the locked TC steady state section of the test drive, the mean number displayed in the statistics window will be incorrect.
Method 2
If you do not have published gear ratios, and they are not in our help file, the method is exactly the same as above, only rather than entering the Gear Ratio Calc into the Gear Normalise Ratio, we leave the Normalise Ratio as 1, and enter the mean figure per gear, in each gear on the Gear Ratio Table instead. This requires zooming into the stead state section of each gear that you logged, not just 3rd gear.
Verify
Once complete, do another test drive, and repeat the steps you did in the prior drive, enabling TC Lockup, and recording a steady state in each gear.
Once complete, check your logs again, and verify that Clutch/TC Slip % now hovers around 0% in each gear wile the Torque Converter is locked.
Do not expect it to be a clean 0%, as TC Slip is calculated by comparing Driving Wheel Speed (Or GP Speed 1-4) and Engine Speed. Most vehicles will have a noisy signal for both engine and vehicle speed, which will cause Clutch/TC Slip to have a noisy runtime as well.
Shift times
To set up Shifting Max Duration and Shifting Min Duration, go to Chassis and Body→Automatical Control→Shifting. These settings put a timer on how long the ECU allows for shifting. As always, refer to PCLinks help file for detailed explanations of each setting.
Shift times can vary greatly under different conditions, line pressure, temperature, load, and RPM. For older transmissions, it can even exceed 2 seconds between the shift being commanded and actually physically occurring.
To set shift times accurately in your tune, you need to log a wide range of conditions for shift times. To get a more or less complete idea of all shift times you can expect.
One of the main factors affecting shift times is line pressure itself. Since we haven’t set this up yet, we can expect our current shift times to differ from what they’ll be once line pressures are tuned.
For now, look through your logs, and find the maximum shift time for each up shift and each down shift, and enter these values into the max duration table with a slight buffer (100-200ms) added on to each.
To find this in your logs, use the time plot, and display:
Gear (Status)
Engine Speed
Clutch/TC Slip
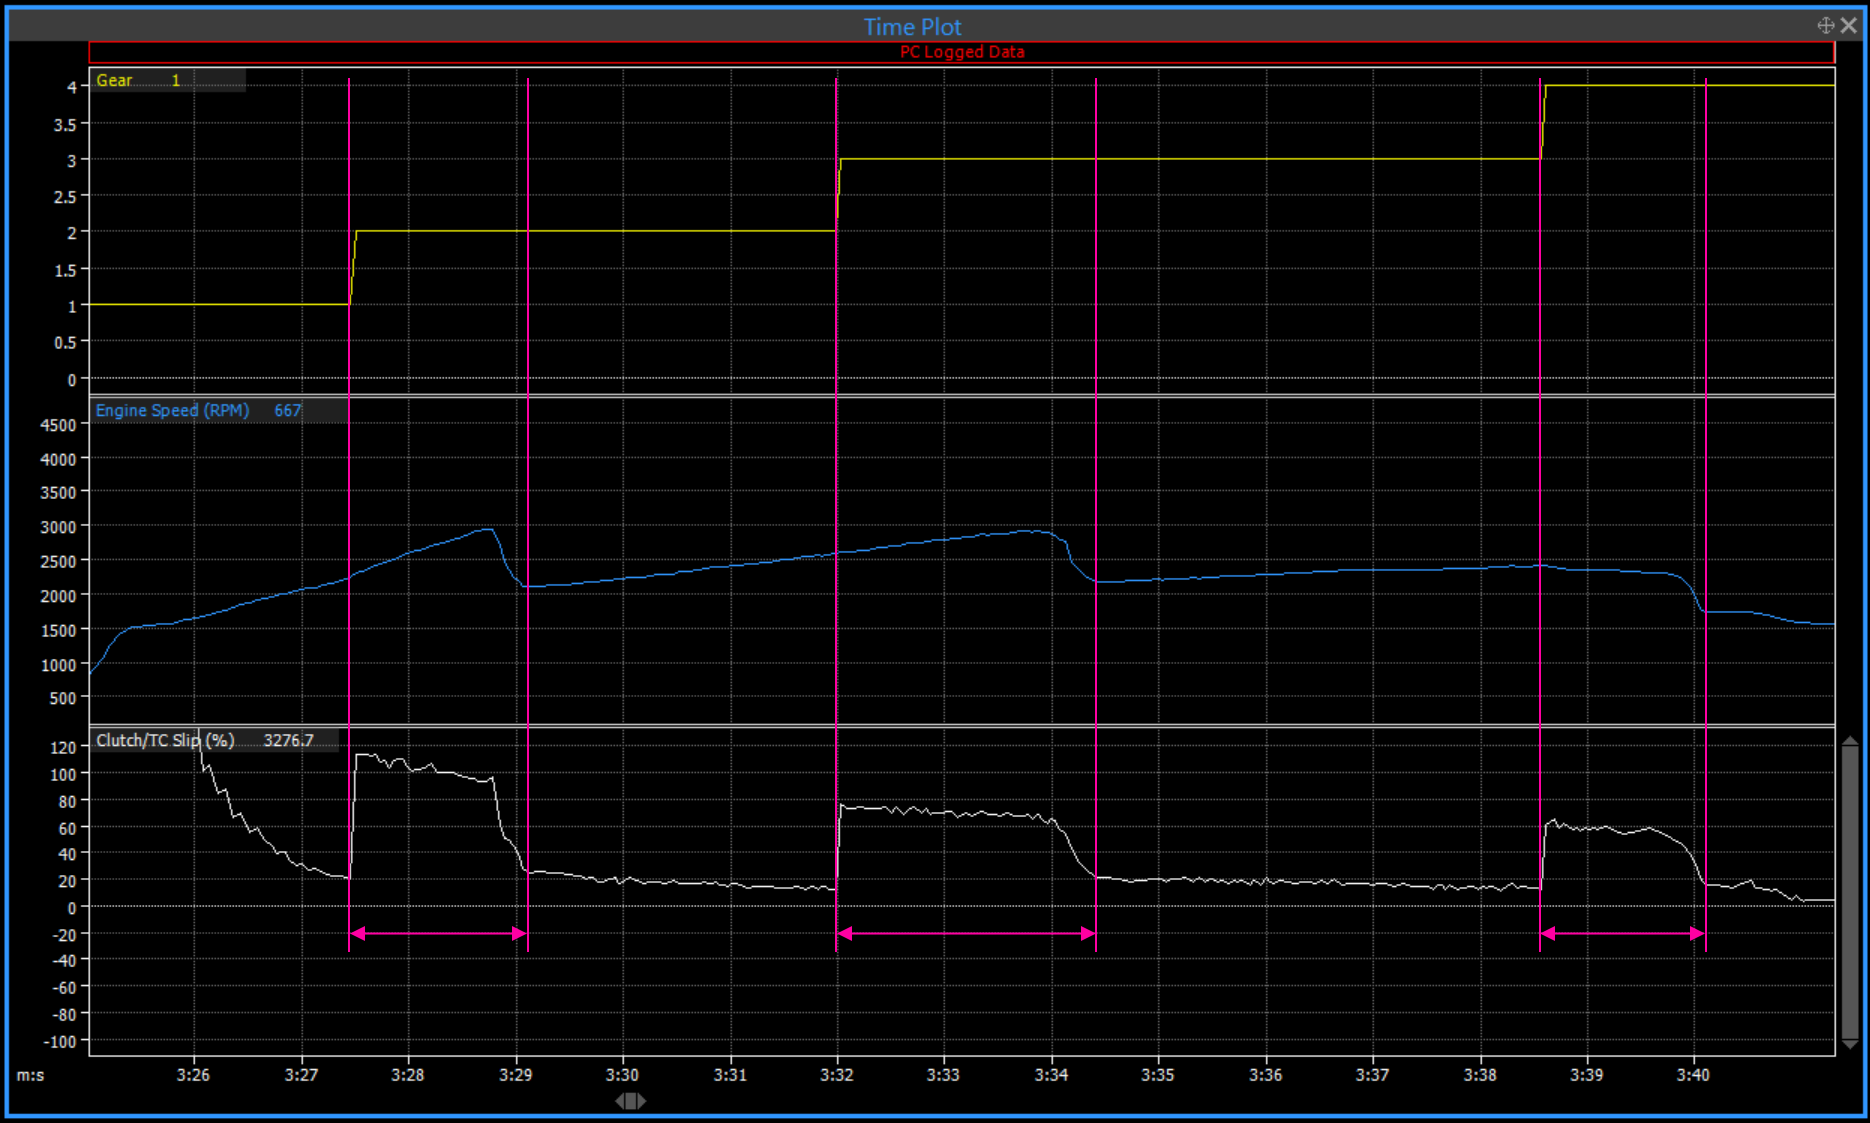
Each shift has been marked with magenta lines. As you can see shift times can vary greatly from shift to shift.
Clutch/TC Slip is the best way to see when a shift is commanded and has physically occurred. As you can see in the graph above, each shift leaves a hump in the runtimes trace. You can consider the shift Started as soon as the gear status changes, and complete once the Slip % returns to a normal baseline
We will return to alter the shift time table later in the fine tuning stage.
To better understand your own transmissions shift times, you can also view runtimes on this time plot such as TPS, Estimated Torque, Line pressure, Line Pressure Duty, and Tansmission Temp.
Max DownShift RPM
Now is a good time to test and set your Max DownShift RPM.
Setting this is a balance between allowing you to enjoy the car without feeling like auto control is being too conservative and babysitting you, but also keeping your driving experience smooth and still protecting your drivetrain.
You can tune this precisely to allow downshifts that get you close to redline, or you can tune it for comfort. No matter how you wish to tune it, it should be set as to not allow the engine to exceed your desired rev limit.
Start by setting a conservative number such as 1000–2000rpm first, depending on your vehicles redline
In each gear, drive at the RPM you think should be the maximum point you’d allow the transmission to shift into that gear. A good starting point is about 1000–2000 RPM below your engine’s redline. Hold that speed steadily, then shift up a gear and place a marker once the shift is complete, making sure you maintain a constant speed.
The RPM in the higher gear at that same speed will be your desired Max Downshift RPM. Enter this value into the table for each, then take the vehicle for another test drive.
Double check your settings. Failure to set this right can result in over-revving the engine.
When testing, you can expect to get very firm downshifts at these high RPMs. Ensure you and any passengers are expecting a firm shift.
Do not perform these tests with any road traffic behind you, perform on a very quiet road, on private property, or on a race track.
Never operate your vehicle in a manor that can endanger other road users.
To test your new settings, drive at an RPM slightly above your Max DownShift RPM, then command a downshift. The ECU should not allow a downshift until you drop below your set Max DownShift RPM for that gear.
Now decelerate to below the RPM you set for that gear. You can expect the downshift to be quite firm when it happens.
Adjust your Max DownShift RPM as desired. Keep in mind this setting will become apparent with spirited driving.
Fine tuning
Following the steps above should get you into a drivable state. Next you can properly tune your line pressures, and other settings that improve drivability.